A common question that I get both from students of my class and also YouTube channel is why do I get either an ImportError or ModuleNotFound error on TensorFlow when using Jupyter. This error usually looks something like the following:
This error can be caused by a variety of issues. I will cover some of the most common ones here.
There are several ways to setup TensorFlow. However, for the purposes of this post I will assume that you have followed the setup instructions that I provide here.
Make Sure you are in the Right Virtual Environment
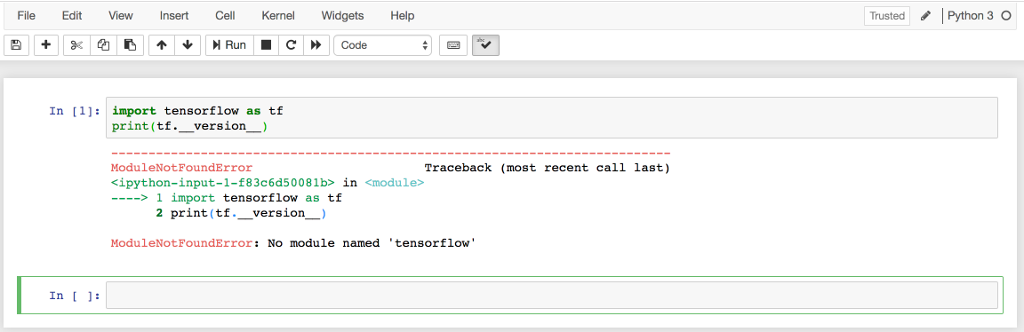
In the above image, this error is occuring because I am not in the correct Python virtual environment. Notice The words “Python 3” near the upper-left corner of the image? This is the baseline Python environment. When we setup TensorFlow we created a new virtual environment named “Python 3.6 (TensorFlow)”. Note: I might have updated the instructions to a version later than Python 3.7 once TensorFlow (and related libraries fully support later versions of Python). The following notebook is in the correct environment.

To make sure that you are using the correct environment click “New” and create a new notebook of the correct type, such as shown here:

I have quite a few different virtual environments! You will not have this many, but you should see the “Python 3.6 (TensorFlow)” that you created earlier. You can also choose “Change Kernel” from the menu to change the kernel of a previously created notebook.
Linking an Environment to Jupyter
Do you not see any new environments, such as “Python 3.6 (TensorFlow)” in the dropdown list when you select to create a “New” environment? If this is the case, you probably did not execute the final commands in the installation instructions. These commands link your environment. First open a commmand prompt or “Anaconda Prompt”. On Windows you will need to run an “Anaconda Prompt”.
First, try to access your virtual environment. Enter the following command:
1 | conda activate tensorflow |
You can also use the following command (on Windows/Linux):
1 | activate tensorflow |
Or, on a Mac:
1 | source activate tensorflow |
This shows a successful activation of the virtual environment:
1 | Last login: Sat Aug 31 06:32:55 on ttys003 |
Notice how my prompt changed from (base) to (tensorflow)? This shows that you are now in the virtual environment named “tensorflow”.
Next lets see if TensorFlow is installed. Enter the python command and the following commands to check TensorFlow:
1 | (tensorflow) administrators-MacBook-Pro-5:~ jheaton$ python |
If this all worked, and you had the tensorflow version print out, then you are almost there! If this did not work, you do not have TensorFlow installed. Review/retry my installation steps, and make sure you create the environment.
If this did work, then you probably did not create the link to Jupyter. This can be done with the following commands:
1 | python -m ipykernel install --user --name tensorflow --display-name "Python 3.6 (tensorflow)" |
You should now restart Jupyter and create a notebook using this virtual environment.